Because That’s What You Do When You Leave Corporate Life Behind.
Seriously, it’s like a badge.
Right off the bat, let’s address the elephant in the starter: yes, breadmaking at home in 2024 is pretty cliché’. People were doing it for fun before the pandemic, and once everyone was told to stay home for a year, the hobby really took off.
Just not with us.
See, for a long time, I ate Paleo. If you’re not familiar, the basics are no grains, dairy, or processed foods–though a not-surprising number of Paleo followers eat copious amounts of bacon, myself included. So, no grains = no bread for me. There are some fantastic grain-free bread recipes out there, but I couldn’t enjoy wheat-based breads. My wife didn’t eat a lot of bread either, mostly to avoid the empty calories.
But that brings us to now, June 2024. If you read my post about home cooking, you can probably guess that I’m back eating what I want. That includes making (in line with slow, intentional living) sourdough bread regularly, as part of our larger effort to eat healthier.
Now, let’s be fair: there are TONS of blog posts/YouTube videos/Instagram reels about making sourdough bread, no two the same. The only diff with this one is that it’s mine. If you’re just getting started with sourdough and wondering why you should trust me, some guy who started regularly baking bread a year ago, I’ve got two reasons for you:
- I’m not a pro baker, so you’re not going to find anything fancy or complex here
- I now consistently make bakery-quality bread, so it can’t be that hard
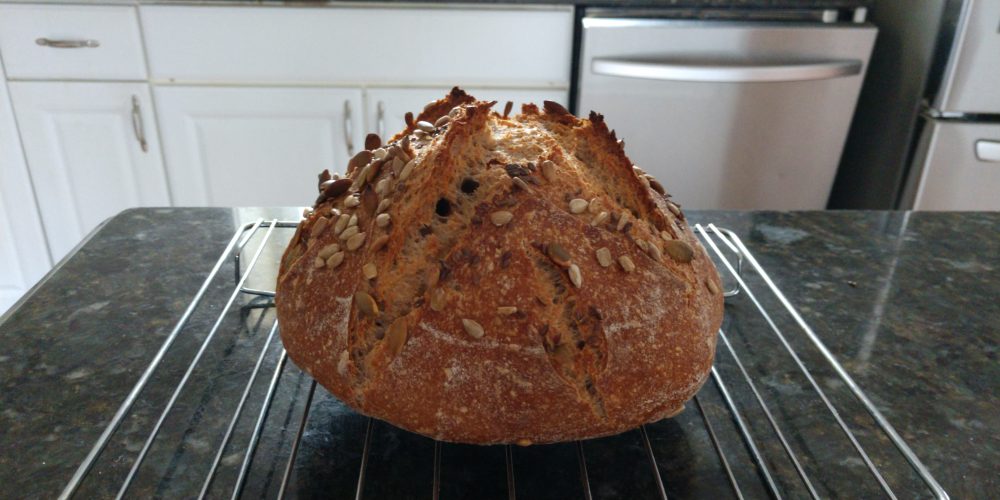
I mean, judge for yourself from these pics:
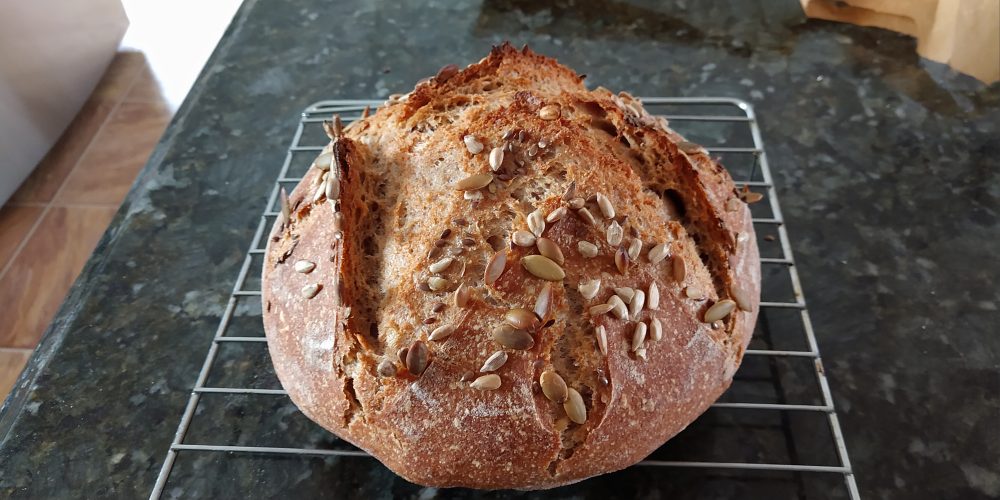
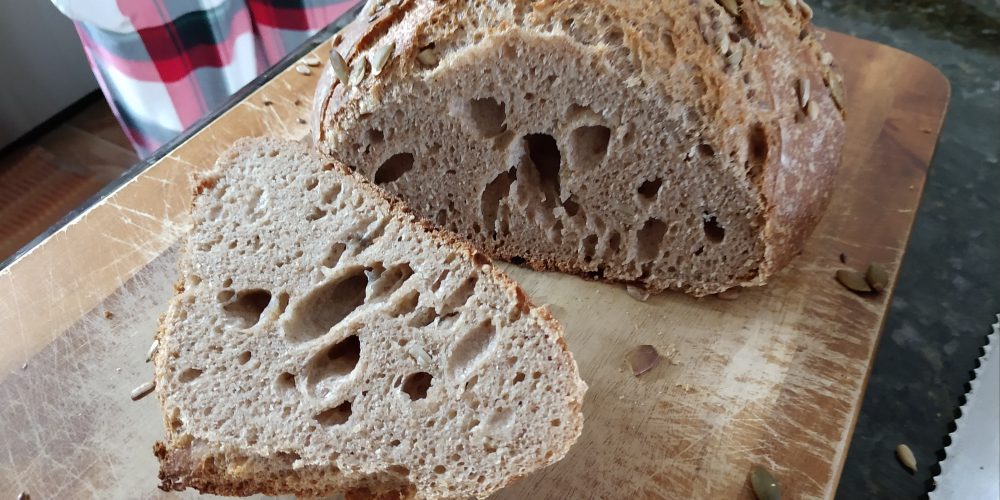
Look good? Tastes even better!
Seriously, I hate to bethat guy, but this sourdough is bulletproof. If you follow the recipe, you’ll make awesome bread. Full stop. The only part that might be tricky is getting the spring (the thing that gives you that excellent dome) during the bake, but I’ll get to that.
Let’s gooooo 🙂
Recipe: Artisanal Sourdough Bread
What you’ll need
- Kitchen scale
- Mixing bowl
- Wooden mixing spoon
- Clean kitchen towel
- Clean counter top
- Bread scraper
- Proofing basket
- Bread lame or razor blade (for scoring the bread before it goes in the oven)
- Parchment paper
- Baking vessel (deep cast iron pan with lid or a Dutch over with a lid)
- Spray oil (optional)
Ingredients
- 90 grams of sourdough starter
- 375 grams of room-temperature water
- 500 grams of bread flour
- (OR, if you want the bread a little tastier and more rustic, 75 grams of rye flour + 125 grams of spelt flour + 300 grams of bread flour)
- 12 grams of salt
- Optional – several tablespoons of seeds, such as pumpkin or sunflower (see the pic below)
Steps
Step 1 – Mix the dough
- Place your mixing bowl on your scale and tare it (set the scale to ignore the weight of the bowl)
- Add your water to the bowl, followed by your starter. I’ve read that a starter that floats is best, but I’ve added my started a little long after a feeding, so it sunk, but the dough rises just fine
- Stir with your wooden spoon until the starter dissolves into the water
- Add your flour, then salt, then seeds (optional)
- Mix into a dough. I recommend you use your hand, but your spoon works, too
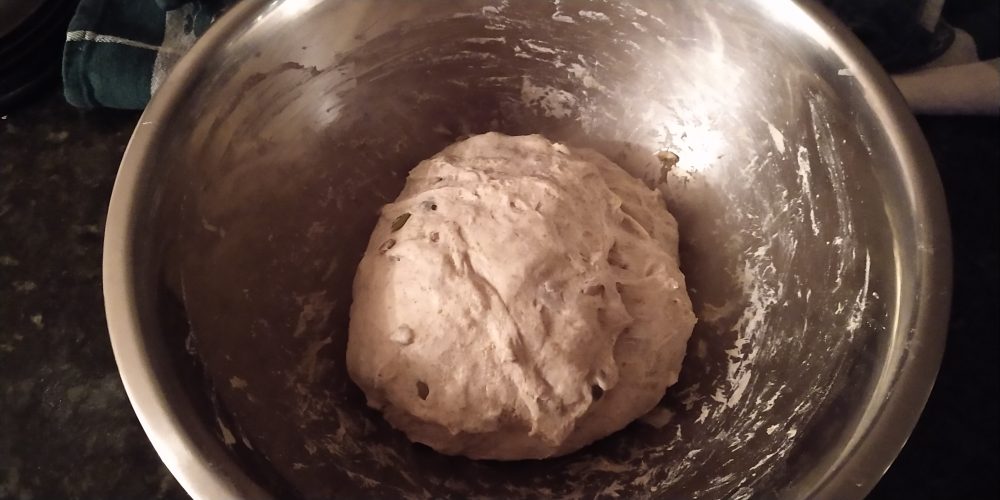
Step 2 – Let the dough rest
- Once your dough feels and looks well combined, cover it with a clean kitchen towel and let it sit for 30 minutes. This is to allow the ingredients to truly incorporate
Step 3 – Develop the gluten
- After 30 minutes, you need to stretch-and-fold your dough. This replaces traditional needing, and develops the dough from a sticky mass into what will eventually go into the oven. To do this, wet your hand, peel the dough off of one side of the bowl, pull straight up a couple of inches (not completely into the air, and definitely do not tear the dough), and fold it down on itself. Rotate the bowl 90 degrees and repeat. Do that 2 more times
- Re-cover the dough and let it rest for another 30 mins
- Repeat steps 1 and 2 of this section 3 more times
- After the final stretch and fold, let the dough rest for 2-4 hours
- You want to see the dough double in size. Temperature in the room will be a factor on how long this takes. Warmer kitchens might see it happen in less that 2 hours, colder might take 4 or more
Step 4 – Shape the dough into a loaf
- Dump the dough onto a clean, lightly floured surface and pop any large bubbles you see
- Wet your hands and flatten the dough out, to about a half-inch thickness
- Fold the dough onto itself like you fold a letter to stick into an envelope
- Tuck the ends under and pull the dough toward yourself. It’ll stick to the counter surface, but you want that; your goal is to create tension on the top of the dough
- Rotate the dough half way and repeat, then again, and again, until you’ve got a nice, tight dome
Step 5 – Rest the dough in the refrigerator
- Flour your proofing basket
- Scoop the dough up with your hands or a bread blade, and drop it tight-top down into the basket
- Pinch any upward-facing gaps, to seal the dough. This will ultimately be the bread’s bottom
- Lightly oil the dough. If you have spray, use a few bursts of that
- Cover the basket with plastic wrap and a kitchen towel, and stick it in the fridge
- Leave it in the fridge up to 36 hours. The longer you let it rest, the sour-er the finished bread will taste, because the yeast and bacteria in the dough will have longer to do their things
Step 6 – First Bake
- Take your dough out of the fridge and let it sit at room temp for at least 1 hour
- While your dough rests at room temperature, heat your over to 500 degrees F, with your baking vessel inside (I prefer cast iron, but a ceramic or metal Dutch oven is awesome, too)
- Let the oven heat with the baking vessel inside for at least 30 minutes
- Cover a dinner plate with a piece of parchment paper
- Uncover your dough, flip the dinner plate over and place on top of your proofing basket
- Securely hold the basket and plate, and flip, so gravity drops the dough onto the parchment paper. Lift the basket away to see your dough
- Score the dough with your lame, a sharp flat-edged knife, or razor blade. This is critical, to release steam during baking
- Carefully take your scorching hot baking vessel out of the oven and open it
- Holding the parchment paper at the edges, lower your dough into the baking vessel
- Reseal the baking vessel and place it into your oven. Make sure the vessel is sealed or you will not get the spring that gives sourdough bread its signature height
- Lower the oven’s heat to 450 degrees F and bake for 35 minutes
- Do not open the oven or baking vessel before 35 minutes. Trust it
Step 7 – Second Bake
- After 35 minutes, your kitchen will smell a-ma-zing. Carefully remove the top of the baking vessel (either by removing the vessel from the oven or, if possible, removing just the lid), set the oven to 400 degrees F, and bake for an additional 15-20 minutes, depending on your oven and how dark you want you crust
Step 8 – Cooling before cutting
- After a total bake time of 50-55 minutes, remove the baking vessel from the oven and turn the oven off
- Lift the bread out by holding and raising the parchment paper
- Set the bread on a cooling rack and let it cool for 1 full hour (or a little less if you can place the bread near an open window to cool quicker)
- Yes, I know, this part sucks because what’s better than fresh warm bread? I need to hold my wife off with spatula every time, but if you cut into it too soon, it will deflate
Step 9 – Enjoy!
- Finally! Slice with a bread knife. The bottom will be tougher to get through than the top or middle, but it’s so, so worth it
Step 10 (optional) – Freeze
- There’s nothing worse than seeing mold appear on home baked bread. Heartbreaking. The good news is this bread freezes REALLY well, so if you don’t think you can eat it all in a few days, go ahead and slice it, wrap the slices in plastic, and freeze for later 🙂

Leave a comment